The Model Context Protocol, or MCP, is a standard that allows Large Language Models (LLMs) to securely access external systems,
tools, and data sources. By connecting through MCP, an LLM can retrieve real-time information and take structured actions,
extending its usefulness beyond static chat interactions. In practice, this means that an LLM can integrate live data
from trusted systems into its reasoning process, enabling more informed and actionable responses.
Kubex MCP extends this capability to your cloud and container environments. It gives LLMs access to detailed operational
information about containers, nodes, and cloud instances, including Densify’s optimization recommendations.
You can use a chat-based LLM interface to review key optimization insights, identify risks, and plan remediation
steps interactively. You can also use an LLM-based coding tool to apply Kubex recommendations directly to your
infrastructure-as-code definitions.
To get started with Kubex MCP, you must use an LLM client that supports the Model Context Protocol.
You can choose an existing LLM client application or build your own. Kubex MCP should work with any LLM
client that supports MCP.Common chat interfaces that support MCP include Anthropic Claude and ChatGPT when Developer Mode is enabled.
Coding-oriented clients such as Cursor, Claude Code, and Gemini CLI also provide MCP support.Alternatively, you can develop your own LLM-based agent using MCP. This approach requires significant
development expertise and should only be attempted if you are comfortable building and maintaining your own
software. Frameworks such as Microsoft Copilot Studio and Pydantic AI provide a useful starting point for
developers who want to build their own MCP-enabled systems.
Each company has a unique Kubex MCP server endpoint. The MCP server URL follows a consistent pattern based on your
company’s Kubex dashboard address. For example, if your Kubex dashboard is located at https://corp.densify.com/kubex/,
your MCP server will be available at https://corp-mcp.densify.com.When using a chat interface, you must add your MCP server to your workspace, which is sometimes
referred to as adding a “connector.” This step typically requires administrative privileges,
so only a workspace owner or administrator can perform the initial setup. Once the MCP server has been added,
authorized users within your organization can connect to it using their Densify credentials.
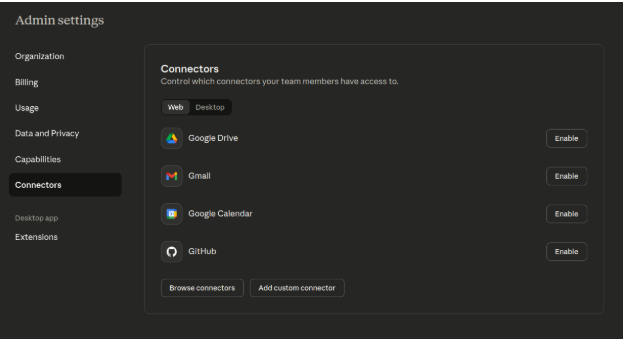
A user with “Owner” or “Primary Owner” privileges must do the initial setup by going to “Admin settings”:
Click ”Add custom connector”, give the connection a name and fill in your MCP server URL:
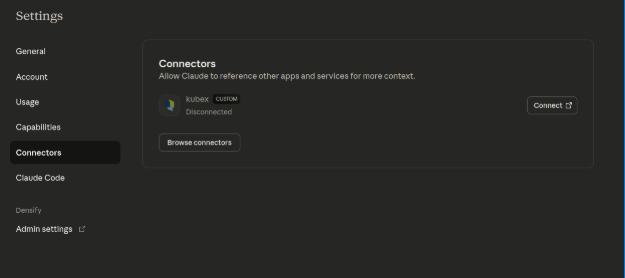
Now that the workspace has been connected to Kubex MCP, each user in the workspace can then connect to it in their user settings:
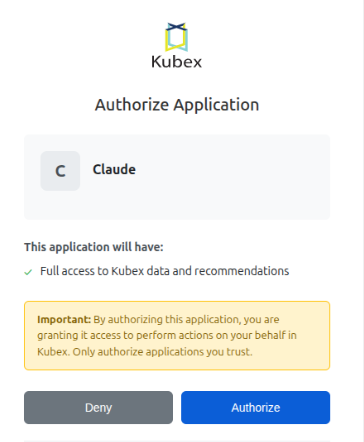
Clicking ”Connect” will redirect to your authentication portal (whether through Densify or a third-party OIDC provider), and then prompt you to authorize Claude to access your Kubex data:
Clicking “Authorize” here will complete the connection. Claude will now be able to access your Kubex data whenever it needs it.If you are using a coding tool, you will need to configure your MCP server URL using the tool’s specific configuration method.
This usually involves running a command in a command-line interface or editing a configuration file.
After adding the MCP server information, you will be prompted to authorize the tool using your Densify credentials.
Once authorization is complete, your coding tool will be able to access Kubex data through MCP in accordance with your permissions.
Access to Kubex data through MCP is tightly controlled. Only users who have been properly authenticated and who have explicitly authorized their LLM client application are allowed to retrieve or act on data. Authorization is temporary and must be refreshed daily for security reasons.Some client applications handle expired authorizations gracefully, automatically prompting for reauthorization when required. Others may not, which can lead to connection errors or incomplete responses. If you encounter these issues, the solution is usually to manually reconnect and reauthorize your client with the Kubex MCP server.
Because MCP allows direct integration between an LLM and your operational environment, it is essential to treat security as a first priority. You should only connect to MCP servers that you trust. A malicious MCP server could attempt to manipulate an LLM into revealing sensitive information or performing unwanted actions.Densify guarantees that the Kubex MCP server is secure and trustworthy. It is designed to provide authorized users with access to relevant data and recommendations without compromising system integrity or user privacy. However, Densify cannot make any guarantees about the behavior of third-party MCP servers. If you choose to use additional MCP connections, you do so at your own risk and should apply standard best practices for verifying the legitimacy and security of external systems.